# Checkpoint SSL VPN Integration
General Overview
This guide explains the configuration of multi-factor authentication (MFA) for Check Point appliance with Mirket. It also includes instructions to configure your Check Point appliance for integration with Mirket.
Prior configuration and deployment of Check Point appliance are required before setting up MFA with Mirket. Check Point appliance offers various MFA configuration modes. In this integration, we've configured RADIUS authentication with Mirket.
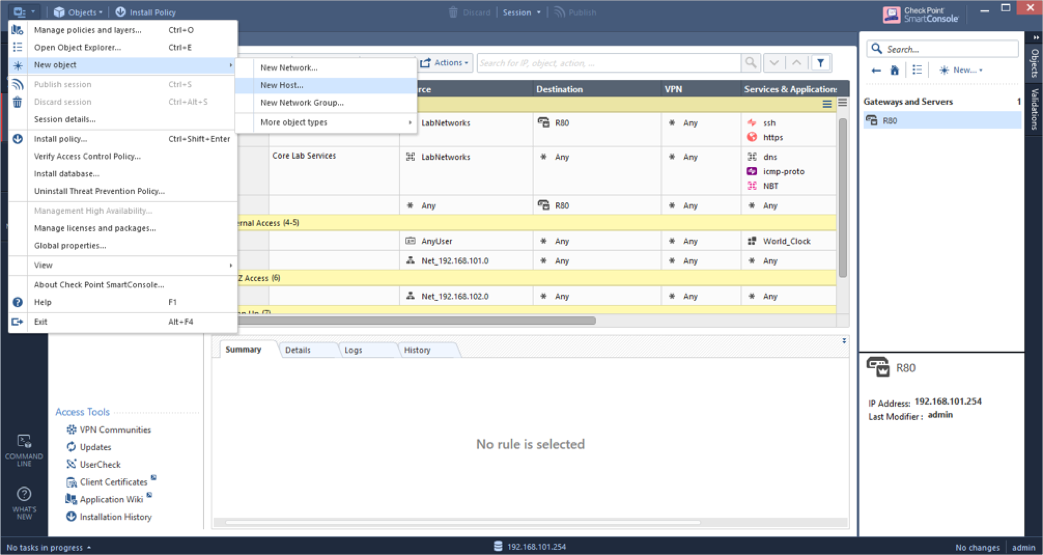
**Create a new RADIUS server entity:**\
Open the Check Point SmartConsole (available only on Windows OS).\
Go to the top-left menu and choose **New Object > New Host**.
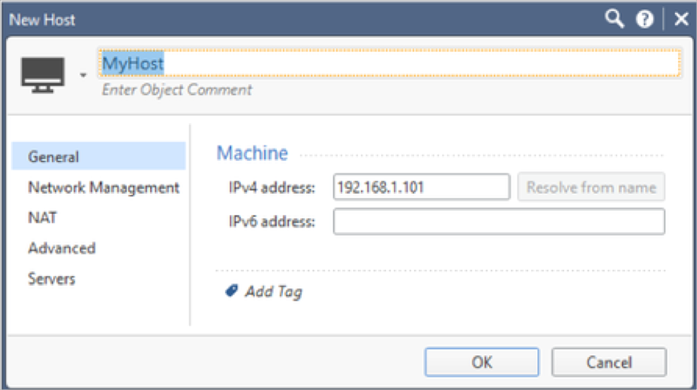
**Input the following details:**
* **Name:** Provide a distinct name for the machine hosting the RADIUS server. For example: *MyHost*.
* **IPv4 Address:** Enter a unique IP address assigned to the host running the RADIUS server. For example: *192.168.1.101*.
* Click **OK** to proceed.
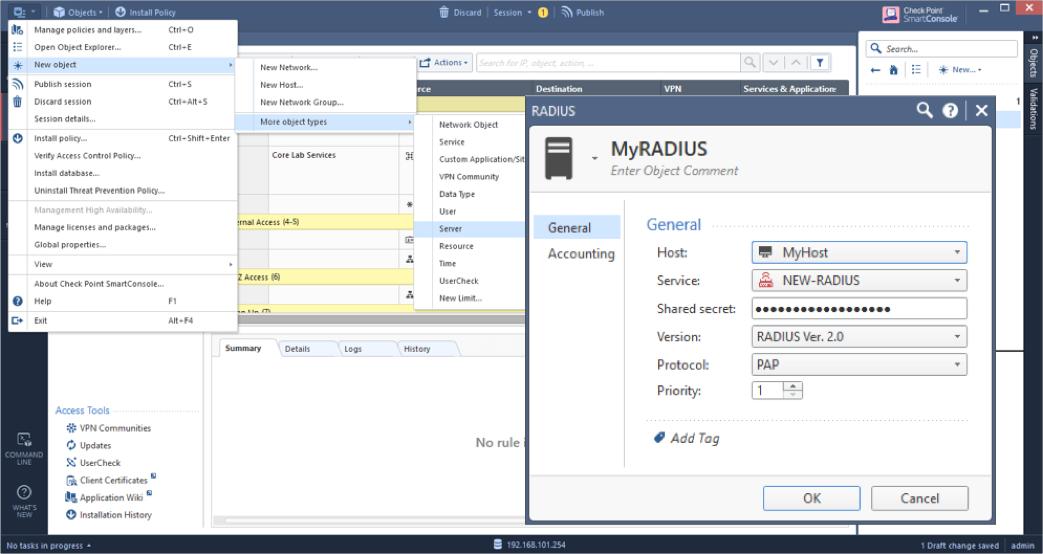
From the menu in the upper-left corner, go to **New Object > More Object Types > Server > More > New RADIUS**. Then, provide the following information:
* **Name:** Assign a distinctive name for the RADIUS server. Example: *MyRADIUS*.
* **Host:** Choose the Host object you created earlier.
* **Service:** Set this to **NEW-RADIUS** to align with UDP port **1812**, which was configured previously in the RADIUS application.
* **Shared Secret:** Enter the RADIUS secret that you configured in the Mirket RADIUS setup.
* **Version:** Choose **RADIUS Ver 2.0**.
* **Protocol:** Select **PAP**.
* **Priority:** Default is set to **1**. You can adjust this if you're configuring multiple RADIUS servers.
Click **OK** to save.
**Note:** Ensure that the Check Point Management Server can reach the RADIUS server over **UDP port 1812** (authentication) and **UDP port 1813** (accounting). You may need to allow these ports through intermediate firewalls or network access control lists.
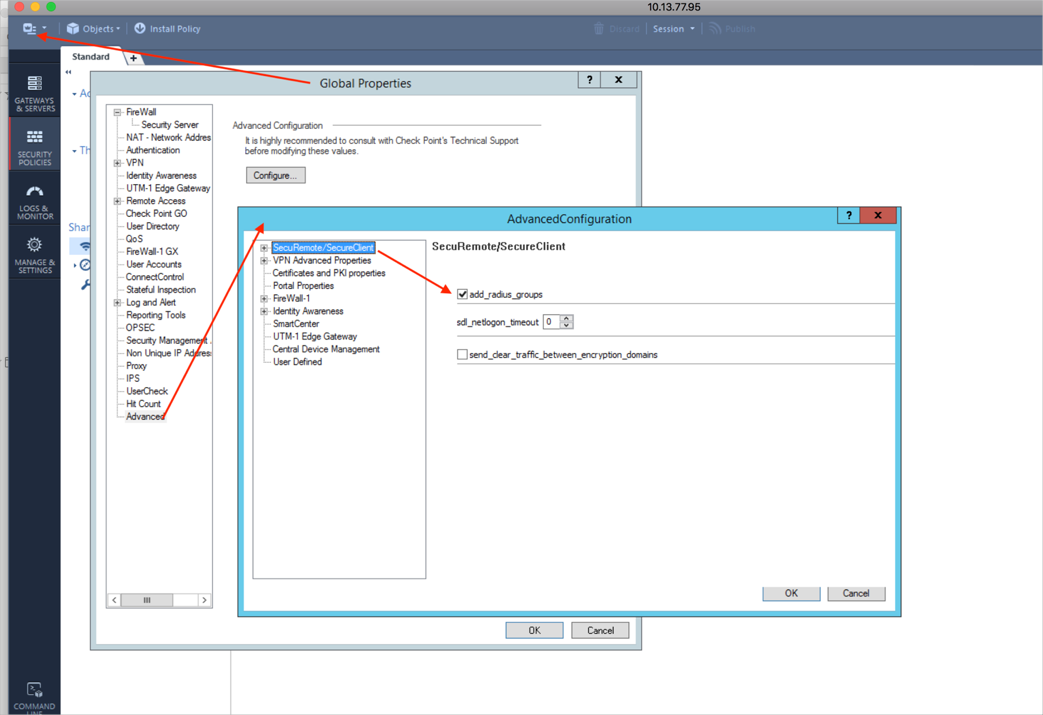
From the top-left menu, go to **Global Properties > Advanced > SecuRemote/SecuClient**.\
Enable the **add\_radius\_groups** option by checking the box, then click **OK** to apply the changes.
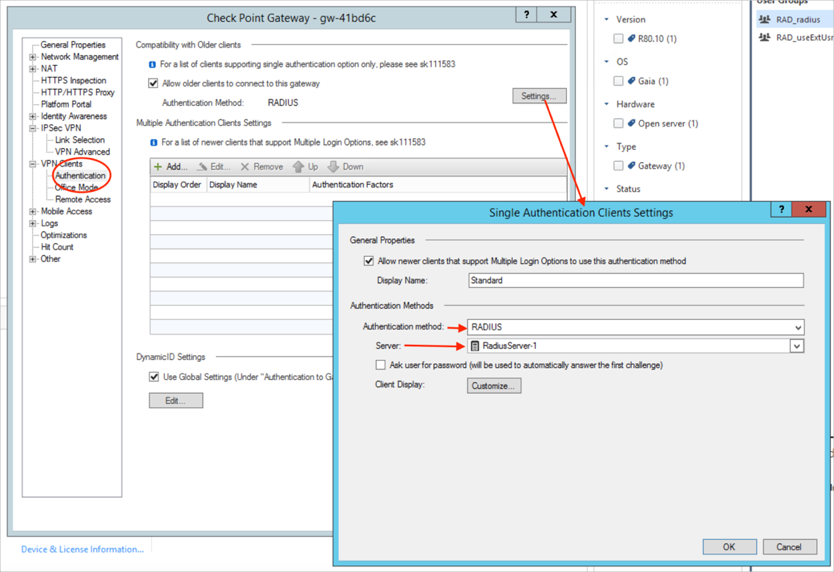
Go to **VPN Clients > Authentication > Settings**.\
In the **Single Authentication Clients Settings** window, choose **RADIUS** as the authentication method.\
For the **Server** option, select the RADIUS server you configured earlier.\
Once everything is set, click **OK** to save the changes.
Make sure Remote access is enabled in Identity Awareness settings.
\
To apply the changes, click **Install Policy**—this will publish your updates and deploy the policy to the **R80 gateway**.
## Configure Mirket
To enable Mirket to receive authentication requests from Check Point, follow these steps:
* Define Check Point appliance as a RADIUS client resource within Mirket.
* Create an authentication policy for the Check Point RADIUS client resource or include it in an existing authentication policy.
* Attach the Check Point resource to the Mirket Radius.
### Add Check Point as a Resource in Mirket with Radius Gateway
Before starting, ensure that you have installed Mirket Radius Gateway from the **Configuration** > **Gateway.** To add a Radius Gateway to the Mirket, follow these steps:
* Go to **Configuration** > **Gateway** and click on the **Add Radius Gateway** button.
* On the displayed screen, enter a name for your Radius Gateway in the **Name** field.
* Enter the SAM value of the gateway in the **Sam Value** field. In Mirket, user identification is done using the SAM (Security Account Manager) name. This is preferred over the standard username. This username is used for authentication and access controls.
* Enter the IP address of the server where the gateway is installed in the **Host IP Address** field.
* Enter the authentication port value you set for the gateway in the **Auth Port** field. The default value is 1812.
* Enter the accounting port value you specified for the gateway in the **Acc Port** field. The default value is 1813. **Note**: After completing these fields, you must create a **RADIUS client** for the newly created RADIUS Gateway.
* Click on the **Add Radius Client** option at the bottom of the displayed screen.
* Enter a name for your Radius Client in the **Radius Client** field.
* Enter the IP address of the client(firewall) that will communicate with the gateway in the **IP Address** field.
* Enter the secret key that the client will communicate with the gateway in the **Secret Key** field.
* Click on the **Save** button to confirm the settings.
### Configuring Radius Gateway
* After creating the Radius Gateway, click on the **Download > Config** from the menu on the right side of the gateway.
* This option will generate a script related to the gateway, which will be displayed from the RADIUS Setup config file. The config file will automatically begin downloading once this option is selected.
* Replace the existing config file in the `"C:\MirketRadius"` directory with the downloaded file. Alternatively, copy the displayed script and paste it into the config file in `"C:\MirketRadius"`.
* Then, restart the **Mirket Radius Service**.
You can check whether the Radius Gateway you created is active by navigating to **Configuration** > **Gateway**.
### User and Group configuration on Mirket
To set up multifactor authentication, make sure you have at least one **user** or **group** in Mirket.
If it is preferred to use a local user, you can first create a local group and then create a local user and make the user a member of the group. Alternatively, you can create a local user without creating a local group.
* [Create a Local Group to add users manually.](https://docs.mirketsecurity.com/mirket-help-center/mirket-help-center/mirket-saas-platform/mirket-portal/groups)
* [Add local Mirket users manually.](https://docs.mirketsecurity.com/mirket-help-center/mirket-help-center/mirket-saas-platform/mirket-portal/users/local-users)
If it is preferred to use LDAP users, the priority External Source is created by pulling users from Active Directory or OpenLDAP in Mirket. **Note**: Before proceeding, ensure that you have installed Mirket LDAP Gateway. ([Refer to create LDAP Gateway.](https://docs.mirketsecurity.com/mirket-help-center/mirket-help-center/mirket-saas-platform/mirket-portal/connector/ldap-gateways))
* [Create an External Source to include LDAP users.](https://docs.mirketsecurity.com/mirket-help-center/mirket-help-center/mirket-saas-platform/mirket-portal/external-sources/active-directory)
* [Sync users from an external user database.](https://docs.mirketsecurity.com/mirket-help-center/mirket-help-center/mirket-saas-platform/mirket-portal/users/ldap-users)
### Add a Radius Rule to Mirket
Radius Rules define user access to resources and the authentication methods available (such as SMS, Approve / Deny, OTP, etc.).
First, you should follow these steps:
* Go to **Configuration > Radius Rules**.
* Click on the **Add Radius Rule** button.
* On the displayed screen, enter a name for the rule in the **Name** field.
* Enter the rule description in the **Description** field.
* Select the Radius Client to which the rule will apply from the **Radius Client** dropdown list.
* Enter the source IP addresses to which the rule will apply in the **Source Adress** field.
* Select the source countries where the rule will be applied from the Source Country dropdown list.
* Click on the **Next** button.
* Specify whether the rule will be applied to a user or a group.
* After specifying, click on the **Next** button.
* Select the users or groups to which the rule will apply. Transfer your selections to the **Selected Users/Groups** table by clicking the arrow icon next to the **Available Users/Groups** table.
* Click on the **Next** button.
* Select the time period when the rule will run.
* **All**: The rule will run every day.
* **Recurring**: The rule will run on the specified days and times.
* **One Time**: The rule will run within the date range you specify.
* After selecting, click on the **Next** button.
* Specify whether the user or group will be granted access based on the rule in the **Action** field.
* Select the authentication provider to which the rule will apply from the **Auth Method** dropdown list.
* Click on **Save** to confirm the settings.
### Test the Integration
To validate the integration between Mirket MFA and your Check Point appliance, perform authentication using a mobile token on your mobile device. For RADIUS resources, available authentication methods include Approve/Deny authentication.
In this example, we illustrate the use of the Approve/Deny authentication method.
* Launch the Check Point Endpoint Security client application. Then click on the VPN client icon in the taskbar and select **Connect to**.
* Choose the public IP address of the Check Point appliance from the **Site** dropdown list.
* Enter your Mirket username in the **Username** field.
* Input your password in the **Password** field.
* Click on **Connect**. Then, select the '**Approve**' option(found in the Mirket mobile app) immediately and make sure it doesn't time out.
#### Related Topics
[Radius Clients](https://docs.mirketsecurity.com/mirket-help-center/mirket-help-center/mirket-on-premise/mirket-admin-panel/rules/radius-rules/radius-clients)
[Radius Rules](https://docs.mirketsecurity.com/mirket-help-center/mirket-help-center/mirket-on-premise/mirket-admin-panel/rules/radius-rules)
[Local Group Configuration](https://docs.mirketsecurity.com/mirket-help-center/mirket-help-center/mirket-on-premise/mirket-admin-panel/user-management/local-group-configuration)
[Local Users Configuration](https://docs.mirketsecurity.com/mirket-help-center/mirket-help-center/mirket-on-premise/mirket-admin-panel/user-management/local-users-configuration)
[LDAP Group Configuration](https://docs.mirketsecurity.com/mirket-help-center/mirket-help-center/mirket-on-premise/mirket-admin-panel/user-management/ldap-group-configuration)
[LDAP Users](https://docs.mirketsecurity.com/mirket-help-center/mirket-help-center/mirket-on-premise/mirket-admin-panel/user-management/ldap-users)
---
# Agent Instructions: Querying This Documentation
If you need additional information that is not directly available in this page, you can query the documentation dynamically by asking a question.
Perform an HTTP GET request on the current page URL with the `ask` query parameter:
```
GET https://docs.mirketsecurity.com/mirket-help-center/mirket-help-center/mirket-saas-platform/integrations/checkpoint-ssl-vpn-integration.md?ask=
```
The question should be specific, self-contained, and written in natural language.
The response will contain a direct answer to the question and relevant excerpts and sources from the documentation.
Use this mechanism when the answer is not explicitly present in the current page, you need clarification or additional context, or you want to retrieve related documentation sections.


